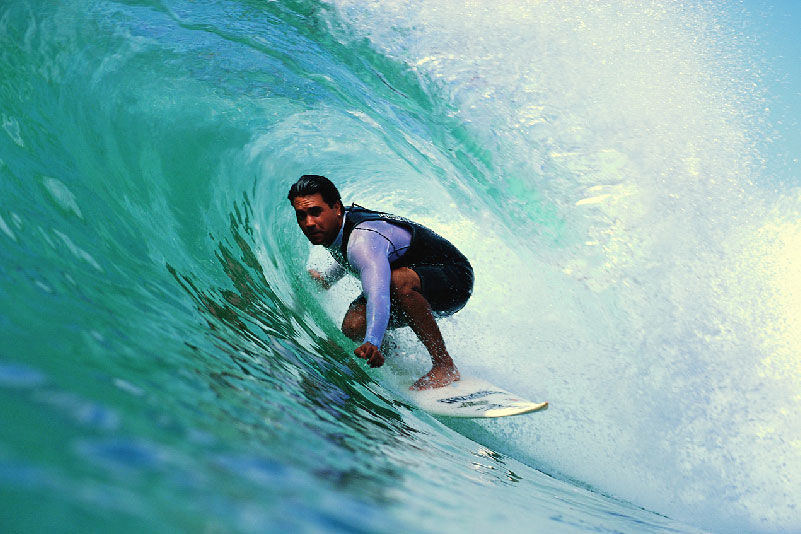

INTRO
It seems that we spend our lives on the hunt. Watching for the next swell, hoping the wind will clean up, living by the rhythm of the coast. And when we look back, it's full and all, but it is punctuated with these moments of blissful belonging to a perfect fluid motion. In those precious fleeting seconds, we were surfers, and all the travel, all the hours spent looking out to sea, all the friendships found on cobble and sand have all been icing on the cake.
Here in British Columbia, the best place to learn to surf is the Tofino-Ucluelet area. The national Park and Tofino city beaches provide miles of sandy shoreline with a wide variety of swell windows. Plenty of elbow room for beginners to develop their surfing skills.
WAVES
sine wave
Learning to Surf - a BC surfing tutorial - Surfing Vancouver Island
Learning to Surf - a BC surfing tutorial - Surfing Vancouver Island
Learning to Surf - a BC surfing tutorial - Surfing Vancouver Island
It's possible to learn to surf anywhere that waves break on a swimable shoreline, given the right equipment and conditions. Most of our local population lies around the straight of Georgia. We often see waves on it but you rarely see surfers on it. Waves are generated by wind moving across water. The water doesn't move with the wind so much as it transfers the energy of the wind dragging across it, into a series of waves. The further distance the wind drags across the water, called fetch, the more powerful and better organized the energy becomes. The waves spread out, and fall into groups that we call sets. There are dominant waves that we call set waves and less dominate waves that we call "your wave" with a smile and a nod. The distance between waves is measured in seconds and we call that the period. We see just the very top of waves. Most of the energy goes deep into the ocean. [graphic of sine waves overlaid on ocean cross section]
When waves are generated over thousands of km, we call that groundswell and we recognize it when the period between the peaks of the waves grows to about 12 seconds or more. In BC we get very little solid groundswell in the mid to high teens [what we hope for] but occasionally we get swells periods of 20 & 22 seconds. When you go through the spin cycle in an overhead long period wave, you become fully aware of the additional power. That should be a long way off for you at this point and we'll talk about picking suitable learning conditions a little later.
Most of the swells that we get are generated by storms [stormswell] that start in the Aleutians and spin down the coast of North America all fall and winter. They get dragged onto the continent by the jet stream anywhere from Alaska to California. We hope for swell direction [where the swell is coming from] that will get into any given break while the wind blows out from the shoreline straight against the waves.
The same storms that send swell to Vancouver Island send swells thousands of km south to Hawaii. When you picture a wave in motion, picture it moving through the water, and like an iceberg, the great majority of the wave is below the surface. As it comes into shallower water at some point the wave begins to drag on the bottom.
the wave begins to drag on the bottom, the wave jacks up, kinda trips and it breaks
This forces the water up [the wave jacks up] and kinda trips the wave and it breaks, the top of the wave falls down in front of itself. The Hawaiian Island are basically a series of Volcanoes that rise from a deep ocean floor. Because the water is so deep, so close to the shore, You end up with the pure, undiminished groundswell, hitting a very steeply rising bottom contour, such as a reef or even a steep beach, and the result is some of the biggest, finest surfing waves in the world. Here in BC the same storms fire swell at us over a shorter distance, and over La Peruse Bank which runs out 20 to 40 km from shore. As a result our beaches slope far more gradually than in Hawaii and consequently our surfing waves are comparatively scaled down in size and power.
For more info and good animations about waves and how they move, check out Traveling Waves
WIND
If the wind is blowing from the water onto the land they are onshore winds. This causes waves to break a little earlier, kind of pushes them over.
If the wind blows from the land out to sea, they are offshore winds. Surfers like em because they haven't traveled across enough water to make chop when we want glassy smooth faces to surf on. They also blow against the incoming swell and sustain the waves from breaking while they jack up a little higher and steeper before they break.
EQUIPMENT
WETSUITS
Learning to Surf - a BC surfing tutorial - Surfing Vancouver Island
Learning to Surf - a BC surfing tutorial - Surfing Vancouver Island
Water temperatures off Vancouver Island vary between the high 40s F in the winter and the low 70's in the height of the summer. We wear suits most of the time. Wetsuits keep you warm by trapping a thin layer of water against your body, which your body heats. If your suit fits loosely it will hold more water, which your body has to heat. The more water that flushes in and out through the cuffs or holes in old suits, the more water your body has to heat. Heating too much water will lower your core temperature and aside from being uncomfortable, could become dangerous in extreme circumstances. If you are shivering uncontrollably, it is time to go in and get warm. If you wait till you stop shivering, it's probably too late for you to rescue yourself.
Fit is not as important these days. Modern stretchy materials form to the wearer so well that a size up or down will probably keep you warm as a perfect fitting wetsuit.
A new suit should almost feel too tight. New materials will stretch out and conform to your body. Make sure you have lots of length in arms and legs. Make sure you can't grab a handful of suit over your lower back. There should be no folds of material under your arms or down your lats.
Most Island surfers make do with a 5/4/3 hooded suit year round. These numbers represent the thickness in millimeters of the body panels/arm & leg panels/joint panels. Thicker suits are available, but as active as surfing is, it's possible to be overheated, even throughout the winter months. We would strongly recommend an attached hood with your suit. It is possible to use a separate hood or a hooded vest with a suit, but when duckdiving through waves, there is usually a lot of flush through the neck seal and down your back.
A second summer suit is great to have. You can make due with a 4/3 or even a 3/2 without hood, gloves or boots through the summer and into the early fall most years, but the thinner the suit the shorter the season that it will keep you warm. Better to pull your neck seal open and flush a little water through to cool you off, than to be stuck with a suit that you're always cold in.
Boots and gloves should be snug without being constricting and should be overlapped by your arm and leg cuffs to create a good seal at those points. Thickness is a matter of warmth vs. dexterity and ability to feel your board with your feet. You can generally find thicknesses from 3 to 7 mm. Many times I've seen surfers in dish gloves when they've forgotten their neoprene gloves. A sorry substitute, but better than nothing on a cold winter day.
Basically it all boils down to one thing in this day of modern surf specific, wetsuits. If you are cold, your suit doesn't fit right.
WETSUIT CARE
Don't pee in your wetsuit. Yes it is comforting when you're cold in a "mother is home but what she don't know won't hurt me" sort of way, but you're just waging chemical, and bacteriological warfare against your poor wetsuit, and it will stink.
Rinse you suit thoroughly every time you use it.
Use a mild detergent or a wetsuit specific soap in warm water to wash your suit, and especially your boots and gloves regularly. Hot water is not recommended for wetsuits.
Keep your suit on a wide plastic hanger. Wire hangers and leaving your suit in a heap on the floor will create creases that will be the first wear-out points on your suit. Creases decrease lifespan.
Do not store your suit in direct sunlight. It will lose elasticity and become stiff and brittle before it's time.
SURFBOARDS
Don't go out and buy a new board right away.
First the surfboard that you use as an accomplished surfer will be far too fragile to take you through the learning process. We want to surf lightweight boards, which means a thin skin over Styrofoam. Beginners tend to be very tough on surfboards. They hit them hard with their knees and put great dents in them. Beginners tend to lean surfboards against cars and walls where they can fall over. They bump them against sharp pointy things, handle them roughly and don't keep them in good padded boardbags. Beginners don't get dings fixed right away and the board takes on water and deteriorates from within. They ride their boards right to the shore and drag their fins on the bottom, causing excessive wear and cracking the glass around their fins or breaking them right off.
For all these reasons you should always borrow your friend's board to learn on, or maybe rent one. If you want to buy a board, look for a larger board somewhere between 7-9' depending on your weight and size. An old beater longboard or mini-mal with layers of fiberglass will work, but the ideal board to lean on is a seamless epoxy or molded plastic surfboard. These boards are nearly indestructible and are what most surf schools use and what most shops rent out. Once you progress to a better surfboard, your beginner board will be handy for small days and as a loaner, for when your friends want to learn.
The board should have some rocker to it. This is the curve you see [or don't see] when you look down the length of the bottom of a surfboard. The rocker makes a board easier to turn, but a little less stable in straight forward motion.
A big wide tail [squash tail] will provide easier maneuverability for turning, but will not anchor in a wave as well as a thin tail [pin tail] and therefore will not turn quite as easily. There are many other types and variations of tails, but to start, stick with the basics and stay choose something besides a pin tail in the early stages.
The wider a board, the more stable it will be. Aim for a surfboard that is at least 20" wide and 24" would not be too wide depending on your body size and arm length. Remember you have to lay on this board and paddle it.
The thickness of a board is a key indicator of how well it will float you. To begin you probably want a pretty thick board at least 2.5" and it could even be over 3" thick. Shortboards are far harder to paddle than longboards because the surfers weight sinks the board and much of the surfer below the water's surface creating drag.
If you buy a shortboard because you are sure you will become a short boarder, you will start out on a surfboard which will be too small for you to learn on. Paddling is tougher and that will make it tougher to catch waves. Learning to surf on a shortboard can be extremely frustrating, but if you must buy a shortboard right off, go for a fish or egg shape, wider than other shortboards and fatter for increased volume to float you better. These are boards that you might well keep in your quiver for smaller, mushier days.
SURFBOARD CARE
While were talking about surfboards, surf wax goes on the top. Unlike most sports, surfers use wax to stick to their boards while skaters, skiers and snowboarders use wax to make their boards slide. If you want to clean old wax off, leave your board in the sun for a while or use a hair dryer and then use a wax comb or plastic scraper. A citrus based cleaner on a cloth will clean up the rest.
Apply wax from the edge of the bar, dragging it across the surface of the board at 90 degrees so the bar of wax kind of stutters and jumps across your surfboard. Over successive applications wax will build into bumps all over the riding surface of your board.
Keep your surfboard out of direct sunlight. The UV will deteriorate the fiberglass skin and discolor it.
Keep your surfboard in a boardbag. Most damage to surfboards is caused in transport and in storage. If you want to look at it in your home, secure it to the wall or ceiling so it can't be knocked over and where it won't get bumped, gouged, bent, spindled, folded or mutilated. Don't lean your board up against your car. It's just about sure to fall over and get damaged.
If you ding it on a trip, seal it immediately. Duck tape is an iffy patch. There are temporary sun cured patching systems available. As well, most surf shops sell permanent resin patch kits with full instructions starting at about $20. Most important rule is to get all the water out before you patch permanently. Pear the hole a little larger if you have to and use a hair dryer or keep the board near a heat source for a few weeks if you have to. If you don't, the water will discolor the affected area over time, big time. Surfboard resins are clearer than ordinary resins and a distinctly different product but if looks aren't a big issue, any polyester resin will do in a pinch.
Learning to Surf - a BC surfing tutorial - Surfing Vancouver Island
Learning to Surf - a BC surfing tutorial - Surfing Vancouver Island
Learning to Surf - a BC surfing tutorial - Surfing Vancouver Island
Learning to Surf - a BC surfing tutorial - Surfing Vancouver Island
YOUR LEASH
Stop before you enter the water and put on your leash. Put your board on the sand fins down [don't want sand in your wax] and attach the Velcro band around your ankle. Sometimes you'll see longboarders secure it around their upper calf. This is to absorb the added pull from a big board in big surf and to keep the leash out of the way a little better when walking around on the surfboard.
When Olympic swimmer Duke Kahanamoku introduced the original California crew to surfing in the 1920s no one used leashes. When they fell, they tried to keep control of their boards because letting go meant swimming into shore to retrieve it and then punching their way back out to the lineup. A lot of work, but it kept surfers in top shape. By the the 60s, surgical rubber tubing was tied to a hole in the fin and the other end around your ankle. A 10' section of leash might stretch out to 30' or more, and begin it's recoil just before your head broke the surface. It was a little like being tethered to a guided missile and you were ground zero. These days leashes are fairly stable, more comfortable to wear and substantially more reliable. Over time they will stretch and this is pretty important to keep an eye on. If you bought an 8' leash and it's now 9.5' long, it has probably become a leash that you should not trust anymore, especially if you have progressed to larger waves.
That brings us to another very important point. You can learn to surf with limited swimming abilities in shallow water and waist high waves. If you want to safely progress into larger waves, you must improve your swimming ability and then keep training. A surfboard is not a life preserver and all leashes can break. If you go out on your surfboard in conditions that you could not swim back into shore through, you are playing Russian roulette. Even just getting out to the lineup with your surfboard can require tremendous physical excretion and if you're not in peak physical condition, you'll get out there exhausted and unable to surf well or enjoyably.
SOMEONE TO SURF WITH
For may people finding the right person to surf with makes every difference in how far you eventually progress. Although it can be said that a surfer is on his own in the water, for most people, surfing is just plain safer and more fun with friends, especially if you surf and learn with someone close to your own skill level. There are the added bonuses of sharing expenses and sharing the responsibility for each other's safety in the water.
Back in the day, we learned to surf by moving to a surfing area and surfing with the folks that we found there. Today there are so many people surfing and the surf areas have such limited housing and jobs available that this is just not an option for most would be surfers. On Vancouver Island most surfers drive from 1 to 3 hrs to surf. Mainlanders add 2hrs for the ferry if they time it just right and there's no line-up.
When planning surf trips, keep in mind that two or more consecutive days of surfing will progress your surfing ability far more substantially than the same number of surfing days over a period of weeks or months. Your first day of surfing will be far more rewarding and safer if you have some guidance and introduction to the equipment and local waters from an experienced surfer to get you started. If you have friends, surfboards and equipment, there is no better way to spend time.
Introductory and the occasional advanced surfing lessons will maximize your learning curve during short surf trips.
TRAINING
Learning to Surf - a BC surfing tutorial - Surfing Vancouver Island
Learning to Surf - a BC surfing tutorial - Surfing Vancouver Island
Learning to Surf - a BC surfing tutorial - Surfing Vancouver Island
Learning to Surf - a BC surfing tutorial - Surfing Vancouver Island
You can enjoy learning to surf mellow little waves with a minimum of physical ability. From youth to old age, whatever your physical condition, the more you invest in your body, the more you will be capable of enjoying surfing. Surfing and paddling employ very specific and little used muscle groups. Unless you surf nearly everyday, you'll want to do a little training to enable your surfing to progress. Your goals are;
* increase your wind and endurance
* strengthen your pop up
* strengthen paddling mussels which are very difficult to target in a gym.
Push-ups, push-ups, push-ups and then more push-ups. This will strengthen your arms for paddling and greatly improve control in your popup.
Squat thrusts are good and any and all cardio exercises to increase your wind.
Chin ups are great but remember to vary the position and direction of your grip on the bar to target as wide a variety of mussels as possible.
Swim laps if you have access to a pool. The breast stroke is close to paddling, but all swimming will help big time.
A good excercise machine can be constructed from a 5 gallon bucket of weights. A cable goes straight up to a clothesline pulley on the ceiling, over to another pulley 5 feet away, and down to a bar that you can barely reach when standing flatfooted on the floor. Doing pull downs on this targets some paddling mussels.
There are commercial surf paddling exercise machines on the market.
POP-UPS
lay on your surfboard with your hands beside your chest
roll your power foot over on your inside ankle and do a push up
bring your front foot up beneath you.
spread your feet wide, both centered on the stringer & 90 deg to the stringer
A pop-up takes you from lying prone on your surfboard to standing position. To practice this you can draw a surfboard in the sand, tape one out on your floor or put your surfboard across your bed [simulates water and protects board. Just don't fall on your head!]
First you have to figure out if you're goofy or regular foot. You may already know which foot you favor if you skate ski or board. If you don't, stand with both feet together at attention and get someone to gently push you forward. Usually the foot you step forward with will be your power [back] foot on the surfboard. Right foot back is regular, and left back is goofy foot.
You need to find your stance. A good stance is spreading your feet as wide as is comfortable. Both feet centered on the stringer and at 90 deg to the stringer.
Do not stand straight up on your surfboard. It will put your center of gravity so high you are sure to fall over fast. Create the lowest center of gravity possible by bending your knees.
Your hands should stretch forward and backward along the line of the stringer to help stabilize you further. In order to stay centered on the board your feet and shoulders should stay centered over the surfboard's stringer.
Now lay flat on your surfboard or sudo surfboard taped out floor with your hands beside your chest like your going to do a pushup.
Take your power foot and roll it over on your inside ankle.
Let the hip above your power foot roll up off the board.
Keeping your power foot back, push your chest off the board and start bringing your front foot up beneath you.
This should take you in one continuous motion from a prone position to two feet on the board . If you go to your knees in the middle of the pop-up, you will not be able to make the bottom turn and your surfing will not progress.
As you become more practiced, your motion will become smoother and more fluent. You will learn how to end your popup stably planted on your board without putting your hands on the board to balance.
Lot's of surfers swear by balance boards for improving balance.
PADDLING
Learning to Surf - a BC surfing tutorial - Surfing Vancouver Island
video .wmv 205 megs
Learning to paddle efficiently is an essential part of surfing. If you can't paddle well, you can't get out to the surf and you can't catch a wave. If you do manage to struggle out, chances are you'll be too tired to enjoy your surf.
We need to find your sweet spot. What that means is you have to find the position of balance on your board where you are neither too far forward or back on your surfboard. If you are too far forward your board will pearl end over end every time. If you are too far back, the submerged tail of your board creates drag and you lose efficiency. Lay prone on your surfboard in the water and extend your arms out to either side. Adjust your body forward or back to make the board float very close to level.
Keep your feet together and begin an overhand crawl. Establish a slow deliberate rhythm and work your breathing pattern into to the paddling rhythm. Fully extend your arms and dig deep. Shallow, short strokes will get you nowhere. The smoother your paddling technique the less energy you will expend for any distance traveled. Don't push too hard. More exertion does not always equal better paddling.
If you have access to lakes rivers or salt chuck, paddle regularly. If you have access to a pool you can even tie the ladder and stationary paddle. Without forward momentum your surfboard will be quite unstable but you'll get paddling exercise and balance training.
FINDING A PLACE TO SURF
Because there is a limited amount of road access to our exposed west coast, there are only a few areas that are commonly surfed on Vancouver Island. This can lead to crowding and short tempers at surfing breaks, especially on the south island. With many people competing for waves, the last thing you want to do is venture into the middle of busy breaks before you have the acquired the skill level to consistently catch and surf waves. There is just no point in frustrating and alienating the people that you will surf with for years to come while you are learning.
If you must learn at crowded breaks, pick areas away from the crowds points, reefs and peaks. Choose the smaller waves off to the side or hunt out lesser used breaks. To my way of thinking the Tofino area is by far the superior area to learn to surf. Not only is there miles of beachbreak making for oodles of elbow room, but most of the bottom is sand which is a little more forgiving to beginners and their surfboard fins.
To begin with you want to be away from other surfers and never directly inshore from kayakers. A Kayak full of water a being pushed by a wave makes a formidable steamroller. By the same token, you on your surfboard in motion can seriously hurt a swimmer, so take care.
Ideally find a sand beach with waste high waves breaking in waste deep water. Ideally the whitewater should break at a point in the wave and gradually spread down the wave face. Become familiar with your surfboard and learn to pop up and stand in these conditions. If the waves wall up sharply and large sections of the wave dump all at once, keep looking. This beach is not a reasonable place to learn at this time. Also be aware that the majority of surf injuries occur to beginners close to the shore [and to well accomplished surfers for that matter]. The problems are varied and include
* laying too far forward on the board so that it nose dives to the bottom [pearls] and stops abruptly. Facial & head injuries can result.
* trying to paddle into a wave that is breaking all at once [dumping shore pound we call it] gets you worked like you were out further in bigger waves only you're in shallow water and the bottom is right there for you to bounce off, and your board is attached to you and kept close in shallow water and will smack you.
A few lessons with a skilled surf instructor can minimize easily avoidable injuries and dramatically sharpen your learning curve.
When you have become very comfortable close to shore you will probably want to get into some bigger waves. They will provide cleaner larger faces and the opportunity to gain enough speed to start making bottom turns and on into all manner of surfing maneuvers.
Wherever you choose to learn, spend lots of time watching. Watch the waves, where they break and the pattern of their breaking. Watch the wind interact with the waves. Ideally it will be straight offshore, and it's force will slow and draw out the breaking of the wave. Be aware of wind direction and speed, swell direction and height, tide height and direction, and remember how they work together at each particular break. As you accumulate this kind of spot knowledge, you'll become better at hitting the right break for any given conditions. Discovering breaks with your friends and learning this stuff on your own kinda makes a spot your own in a way that learning from someone else can never do. That's my considered opinion.
Learning to Surf - a BC surfing tutorial - Surfing Vancouver Island
Learning to Surf - a BC surfing tutorial - Surfing Vancouver Island
PADDLING OUT
Watch the waves at a spot before you go out. Most surfers check a spot before putting on their wetsuit and might watch for a few minutes or might stand there for hours if they're waiting for tide or wind changes. They watch for how the waves are breaking, how long the surfable sections are, where they close out and of course where they break. They watch for sets [the patterns of a big waves and smaller waves] and they look for sets within sets. Forget that nonsense about 7 waves in a set. Every swell is different and swells vary according to many influences including fetch, wind, currents, bottom contour, tide height and direction and then you start mixing swells, two hitting at once, or the period of transition between two swells at any given location. What I'm getting at is that every break works differently for each swell that arrives, and you want to learn to surf well, you have to study waves. It's also handy to know when any lulls are going to happen and how long they might last so you can sneak out during them instead of fighting your way out through the set waves [the big dudes]. They look for cleanup sets that huge compared with the rest and leave surfers scratching for the outside lest they get pummeled inside.
Watch other surfers at the spot where you will surf, where they paddle out and how they time their go out in between sets. Watch them paddle anywhere, even into turbulent waters rather than get in the way of an up and riding surfer.
Watch the foam on the surface and look for horizontal movement indicating rip currents and look for where the foam moves out to sea. Notice that the incoming waves are kind of beaten down and smaller around these outflow channels and that makes them a good place to paddle out. Rip currents are caused by incoming waves piling up water along the shoreline. The excess water moves horizontally along the shore to a headland, rocks or a trench and then flows back out to sea. The currents can be surprisingly strong, like being in a fast flowing river. If you are caught in one of these outflows and try to paddle straight back into the shore, you'll only exhaust yourself, and are unlikely to make any headway. If you turn parallel to the shore and paddle a short way, you'll be out of the outflow in moments and in water that is pushing back towards the shore. One of the many situations in the ocean where panic will screw you, and a moment of clear thinking will keep you safe and in control of your situation.
DUCK DIVING
The purpose of duckdiving is to get you through a wave that you can't paddle around or over, while losing as little gained distance as possible to the shoreward motion of the wave.
Carry as much momentum paddling toward and up to the wave, as you can. Lay prone on your board and as the trough of the wave approaches lift your chest as high off the board as you can. Drive the nose of your board as deep into the water as possible with as much force as you can muster. As the wave passes over you transfer your weight from the nose of the board to the back using your foot and pulling up on the nose. Depending on your positioning and momentum, it may take little to make you rise up through the backside of the wave and continue paddling down into the trough beyond. Repeat as necessary.
Learning to Surf - a BC surfing tutorial - Surfing Vancouver Island
CATCHING A WAVE - Beginner on shoreline reformed waves
Once you have chosen a wave, turn your board toward the shore and paddle as hard as you can toward the shore. As the wave hits your feet take 2 or 3 more strong strokes and as the whitewater gets to your chest you will feel the wave take over pushing you. This is your big chance. Popup and remember your stance. If you stand straight up, you will fall straight over like it was a law or something.
CATCHING A WAVE - Novice
Once out in the lineup beyond the impact zone [where the waves break] always keep an eye toward the incoming waves. Although you are outside where the waves normally break, cleanup sets can surprise you and leave you inside and next in line for a pounding, not to mention having to paddle back out without a ride.
Choose a wave that looks like it will be steep enough to ride and that you think will break very close to you. On beach break the takeoff point will vary back and forth and takes a bit of luck to start with. Paddle hard and fast to match the speed of the incoming wave as closely as you are able. As the trough of the wave seems to fall out from in front of you the wave will start to grab you. this is the moment of truth. If you can make it onto the face of the wave, take another stroke or two, pop up and ride down the face. If the wave is going to break out from under you, back stroke with both hands to pull yourself onto the back of the wave and turn and paddle back out. Keeping a close eye on the next incoming wave. It may have your name on it.
The Rules
* Don't Drop In
the surfer up and riding who is closest to the white water owns the wave. If you drop in on someone's wave, the cosmos may no longer support you. All warrantees and guarantees, written, stated or implied, may be voided.
* Don't Snake
In the lineup, if you paddle around someone who is in position and get deeper in position than they are to take their wave you have snaked the other surfer. Sea lions find this particularly arousing, but you never, ever want to arouse a sea lion.
* Don't Go Agro
If you go agro with other surfers, surely the same will be revisited on you, tenfold. If you go agro on a wave, we want to watch.
* Respect the Locals
Respect the regulars at all breaks. They wait long periods for good swell and then face crowds when the swells arrive.
The line-up
The lineup is where you wait to catch waves, just a little outside of where they will break. Most surfers sit on their boards and face offshore to watch for incoming waves. Because different size waves will break closer to shore and further out, your point of take off will vary on any given wave. When a set comes in, your position in the lineup will dictate wether you can go for a wave. If the surfers close by you have been waiting longer than you or not will dictate if you should go for a wave or not.
Localism
When you paddle out into a new lineup for the first many times, chances are good that you are paddling out into a group of people that have known each other for years. They will generally not be particularly happy to see a new face. They will have no idea if you have any manners or not, if you will be a wave hog, or just bring down the vibe in the lineup. Wether you will go out of turn, or just clog up the lineup without having the skill level to make use of the precious few waves available at the spot. If you show up full of attitude, you can expect to be received as poorly as if you had just burst into a stranger's living room uninvited. Of course all people, citizens and visitors alike are guaranteed unrestricted access to foreshores and waterways in Canada, but the trick is to reject any denial of access to any public lands or waterways in Canada without getting so serious about it that you invite pecking from the other roosters & chickens in the yard.
The advice is simple;
* Watch a surfing break for a long time, even over several visits, before you paddle out. Even after you are surfed out [or before] check spots that you would like to surf in the future.
* Learn to surf on small waves that proficient surfers aren't into. You find them near where better surfers are surfing. Do not pick a spot between the beach and where surfers are sitting. They'll be surfing there.
* As you progress and want to move into better formed breaks, make the move when the break doesn't have a packed lineup. Real good surfers show up at their favorite breaks and move on, because it's overcrowded, all the time. Go explore a bit and find a quiet little break to hone your skills. You'll also learn faster with the better wave count a quiet break will provide you with.
* Be friendly with others, regardless of their demeanor. Do not expect confrontation and don't be quick to recognize a standoffish demeanor as confrontational.
* If you surf with courtesy, you will become accepted.
* If you are confronted with a threat of violence at a surfing break, call 911. The only way surfers can continue to expect a peaceful surfing experience is to reject and confront any other alternative.
Surfing related aggression and violence is more of an urban myth on Vancouver Island, than an ongoing phenomenon. As far as we can figure, a very few incidence have taken on legendary status. There are a few unfriendly characters as can be expected in any surfing population these days, but by and large BC surfers are hospitable to each other and visitors alike.
Source : surfingvancouverisland.com